One way to achieve a designer look in your home is properly hung artwork. If you are like me, you like to take plenty of pictures of your family and travels, but arranging them on the wall can be a bit of a struggle. Here are some tips to get you that designer look at home!
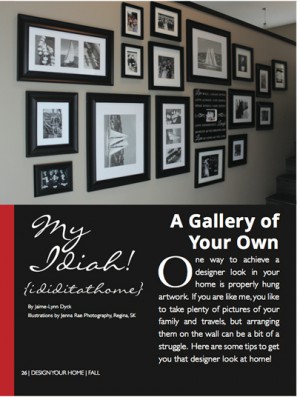
Groupings are more effective when hung in symmetry, like a square or rectangle. Find a commonality to tie the grouping together, such as all-black frames, wood frames, or white mattes. If you already have a collection of frames, consider painting them all the same colour. Find the wall space you wish to hang your gallery and let’s get started!
Lay your frames on the floor in different patterns, until you find a layout you like. Spacing should be 2-3 inches apart between frames on all sides. Trace the frames on a large piece of paper and hang the traced paper on the wall, for even a day or so, to get a good feel for it. You can also cut each frame size out of paper and stick them individually to the wall and move them around as you see fit. Pictures should be hung at eye level which is approximately 57 inches (to centre of the picture). When hanging your gallery, be sure that the centre of the grouping is 57 inches.
Tip: for higher ceilings, you can hang slightly higher. Mark the nail/hook location of each frame on the paper hanging on the wall and nail/screw it right over the paper. Then just tear the paper away. This will ensure your photo gallery is hung according to your layout.
Now fill your frames with your favourite pictures and enjoy your new photo gallery!